

You’ve unboxed your new Shark VacMop and want to make the most of its 2-in-1 cleaning power. This cordless device vacuums and mops at the same time, making it ideal for busy households with hard floors. Learning how to use a Shark vacuum mop the right way helps you get streak-free results, protect your floors, and keep the device running smoothly for years.
In this guide, you’ll discover step-by-step setup instructions, smart cleaning techniques, and essential maintenance habits. Whether you’re dealing with pet hair, sticky spills, or everyday dust, these tips will transform your floor care routine in minutes.
Install the Cleaning Pad Correctly
Align the Pad with the Notches on the Base
Every cleaning session begins with a fresh pad. Flip the VacMop over to expose the white cleaning base. Take a new disposable pad and line it up with the two plastic notches on the bottom. Slide the pad forward until it clicks into place to ensure full floor contact and prevent slipping during use.
Replace Pads After Each Cleaning
Shark designs these pads for single use only. Once you’ve finished, press the release button on the side to remove the pad and toss it in the trash. Reusing dirty pads spreads grime across your floors and reduces overall cleaning power.
Pro Tip: Stock up on replacement pads. Using a fresh pad for each room stops allergens and bacteria from spreading throughout your home.
Fill the Cleaning Solution Tank
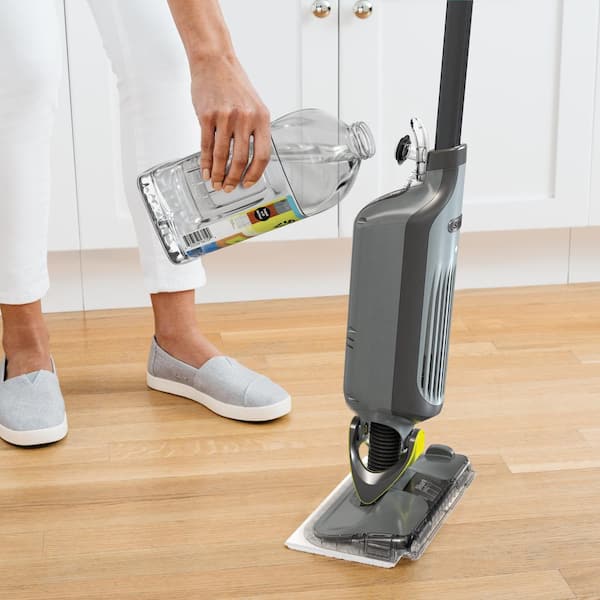
Add Shark VACMOP Cleaner Only
Open the hinged lid on the back of the unit. Pour in the included trial-size Shark VacMop cleaning solution. Avoid using plain water or other household cleaners, as the formula is pH-balanced to safely clean hardwood, tile, and laminate while cutting through grease and grime.
Fill to the MAX line, then press the lid firmly until it clicks. A loose cap can cause leaks and reduce spray performance.
Never Overfill the Reservoir
Pouring too much solution leads to dripping, especially when you tilt the mop. Wipe any spills around the opening before you start. A full tank generally provides 10 to 15 minutes of continuous mopping time.
Vacuum Before You Mop
Start with Dry Suction Mode
Always begin by vacuuming. Pull the trigger on the handle to activate suction. The centered intake pulls dust, pet hair, and debris from edges and corners that traditional mops often miss.
Why it matters: Vacuuming first stops dry dirt from turning into muddy streaks when wet, which can scratch floors and clog your pad.
Angle the Head for Edge Cleaning
Tilt the mop head slightly toward baseboards to catch dust hiding along walls. Move in slow, straight lines for maximum suction power. The motorized brush roll pulls up embedded hair, which is great for homes with shedding pets.
Activate the Spray Mop Function
Press and Hold the Spray Button
Once dry debris is cleared, switch to wet mopping. Press and hold the spray button on the top front of the handle. A fine mist releases just ahead of the pad, loosening sticky spots without soaking the floor.
Always spray while moving forward. Never spray while standing still, since this causes liquid to pool in one spot.
Control Moisture on Sensitive Floors
Hardwood and laminate can warp when exposed to too much water. Use short spray bursts and keep the pad damp, not soaking wet. A properly moistened pad glides smoothly and leaves no puddles behind.
Warning: Excess moisture that seeps into floorboard gaps causes permanent damage over time.
Use the LED Reveal Light for a Deeper Clean

Spot Hidden Dust and Debris
The blue LED Reveal light turns on automatically when the unit powers up. It illuminates fine dust, pet hair, and smudges that are invisible under normal lighting. This feature is especially helpful in corners, under furniture, and in dim hallways.
Wipe Until the Floor “Disappears”
Keep cleaning until the blue glow shows a fully clean surface. If you still see streaks or shadows, make another pass. The LED light ensures your cleaning goes beyond the surface for a truly spotless result.
Empty the Dust Canister After Every Use
Remove and Dispose of Debris
Press the release latch to detach the base. Hold it over a trash can and open the bottom door. Dust and debris fall out directly, with no need to touch the mess.
Rinse the canister monthly with warm water if fine dust or hair builds up. Let it air-dry completely before snapping it back onto the unit.
Common Mistake: Skipping this step reduces suction power and creates unpleasant odors over time.
Charge for Maximum Runtime
Place It on the Docking Station
Set the VacMop upright on the included charging dock and plug the dock into a standard wall outlet. A solid blue light shows the unit is charging. The light turns off once the battery reaches full capacity.
A complete charge takes roughly 3 to 4 hours and delivers up to 20 minutes of combined vacuuming and mopping.
Recharge After Every Session
Don’t wait for the battery to die. Plug it in right after each use so it’s always ready to go. Avoid unplugging the dock early, as partial charges can shorten the battery’s overall lifespan.
Store and Maintain Your VacMop
Keep It in a Dry, Upright Spot
Store your VacMop standing upright in a closet, pantry, or utility corner. Avoid laying it on its side, since this can damage internal parts or cause solution leaks. Wipe the handle and nozzle with a dry cloth after every use to keep cleaner residue from hardening.
Replace Parts on a Regular Schedule
Swap the cleaning pad after every use. Refill the solution tank when empty. Check the filter once a month and tap it gently to remove dust, or rinse it if your model has a washable filter.
Longevity Tip: Stick with genuine Shark accessories. They keep your warranty valid and ensure the device performs as designed.
Troubleshoot Common Issues
No Spray Coming from the Nozzle
Check these three things:
– Is the solution tank empty or not sealed properly?
– Is the spray button stuck or clogged?
– Is debris blocking the front nozzle?
Clear blockages with a paperclip. Then prime the system by pressing the spray button 10 times while holding the mop off the floor to restore normal flow.
Weak or Loss of Suction
Common causes include:
– A full dustbin
– A clogged filter
– A worn or tangled brush roll
Empty the canister, rinse or tap out the filter, and inspect the roller for hair. Use scissors to cut away tangled fibers instead of pulling them.
LED Light Not Turning On
Confirm the unit is powered on. If the light stays off, check for loose connections or reach out to Shark customer support. Do not attempt to disassemble the unit yourself.
Build a Smarter Cleaning Routine
Tackle High-Traffic Areas Daily
Spend five minutes a day running the VacMop through kitchens, entryways, and pet zones. Quick daily touch-ups prevent dirt buildup and reduce the need for deep cleaning later.
Pair with a Weekly Deep Clean
The VacMop handles everyday messes, but pair it with a traditional mop or scrub brush once a week. Focus on grout lines, under appliances, and other spots the VacMop can’t fully reach.
Time-Saving Hack: Keep your VacMop charged and loaded in your busiest room. When it’s ready to go, you’re more likely to use it consistently.
Frequently Asked Questions About Using a Shark Vacuum Mop
Can I Use Plain Water Instead of Shark Cleaner?
No. The Shark VacMop is designed to work with its proprietary cleaning solution. Plain water lacks the surfactants needed to cut grease and grime, and using other cleaners can damage internal components or void your warranty.
How Long Does the Battery Last on a Full Charge?
A fully charged battery provides up to 20 minutes of combined vacuuming and mopping. Charging takes about 3 to 4 hours from empty to full.
Are the Cleaning Pads Reusable?
No. Shark VacMop pads are disposable. Replace the pad after every use to maintain cleaning power and avoid spreading dirt across your floors.
Is the Shark VacMop Safe for Hardwood Floors?
Yes, when used correctly. Use short spray bursts and avoid letting liquid pool on the surface. Excess moisture can warp hardwood and laminate over time, so always keep the pad damp rather than soaking wet.
How Often Should I Clean the Dust Canister?
Empty the canister after every use to maintain strong suction. Give it a thorough rinse with warm water once a month and let it air-dry completely before reassembling.
What Should I Do if the Spray Nozzle Clogs?
Use a paperclip to gently clear the nozzle opening. Then press the spray button 10 times while holding the unit off the floor to prime the system. If the clog persists, contact Shark support for help.
Key Takeaways for Mastering Your Shark Vacuum Mop
Knowing how to use a Shark vacuum mop turns floor care into a fast, effective routine you can stick to daily. Start by vacuuming dry debris, then switch to spray mopping for a streak-free finish. Use the LED Reveal light to catch hidden dust, empty the canister after every session, and recharge immediately to keep the battery healthy. With fresh pads, genuine Shark solution, and proper storage, your VacMop will deliver spotless hard floors for years to come. Charge it up, grab a fresh pad, and enjoy cleaner floors in just minutes a day.


