
Installing a vacuum canister system is one of the smartest upgrades you can make to your home. Imagine never lugging a heavy upright vacuum up the stairs again. Instead, you simply plug a lightweight hose into any wall inlet and let a powerful, centrally located motor do all the work. Central vacuum systems also improve indoor air quality by venting dust and allergens outside your living space.
This guide covers the entire installation process from start to finish. You will learn how to choose the perfect location for your unit, run PVC piping through walls, wire low-voltage controls, and test your finished system for optimal performance. Whether you are a seasoned DIYer or a first-time installer, these steps will help you build a system that lasts 15 to 20 years.
Choose the Best Location for Your Vacuum Canister
Select a Garage, Basement, or Utility Room
The canister unit should live in an out-of-the-way space such as a garage, basement, utility room, or large storage closet. These locations keep motor noise away from living areas and provide easy access for maintenance. The chosen floor must be level, dry, and strong enough to support 30 to 60 pounds. Leave at least 24 inches of clearance in front for filter access and 6 inches on the sides for proper ventilation. Avoid unheated areas where freezing temperatures could damage internal components.
Verify Power and Vent Access Nearby
Your canister needs a dedicated 15-amp or 20-amp electrical circuit with a grounded 3-prong outlet. Install a GFCI-protected outlet if the unit sits in a garage, basement, or any damp location. Position the canister close to this outlet to eliminate the need for extension cords. If you plan to vent exhaust outside, the unit should sit within reach of an exterior wall. Plan a 2.5-inch diameter vent hole that slopes slightly downward to prevent condensation buildup. Never vent into an attic or crawl space, as this can lead to moisture damage and mold growth.
Avoid These Common Placement Mistakes
Many homeowners place the unit too close to living areas and later regret the noise. Others hide the canister behind stored items, making filter changes a chore. Always prioritize serviceability over concealment. Never install the unit in a sealed enclosure without airflow, as this will cause the motor to overheat. Avoid locations near water heaters or furnaces, where lint buildup creates a fire hazard. If you anticipate expanding the system later, install a slightly larger unit now to save time and money in the future.
Mount the Canister Unit Securely
Wall-Mount With Stud-Finder Accuracy
Most central vacuum canisters mount to the wall using a heavy-duty bracket. Start by locating wall studs with a stud finder, since studs are the only safe anchor points for this much weight. Hold the bracket at a height of 36 to 48 inches from the floor to the bottom of the unit. Use a level to confirm the bracket is perfectly horizontal, then mark your screw hole positions. Pre-drill pilot holes into the studs using a bit matched to your lag bolts, which should be 3 to 4 inches long. Choose fasteners rated for at least double the canister’s weight. For concrete walls, use masonry anchors and a hammer drill.
Set Up Floor-Standing Units Safely
If your model is designed for floor mounting, place it on a flat, stable surface with rubber vibration pads underneath. These pads reduce noise transmission through the floor. In high-traffic areas or earthquake-prone regions, secure the unit to the floor with anti-tip brackets. Consider placing the canister on a 6 to 12 inch platform to make filter removal easier. Maintain 6 inches of clearance on all sides for cooling airflow. Never place the unit directly on carpet, as this restricts intake and traps heat.
Connect the Exhaust Vent Properly
Drill a 2.5-inch hole through the exterior wall at a downward angle of ¼ inch per foot. This slope allows condensation to drain outside rather than back into the unit. Install the vent hood from the outside first and seal the edges with silicone caulk to prevent air leaks. Attach the exhaust hose from the canister to the vent and tighten both ends with stainless steel hose clamps. Position the outdoor vent at least 12 inches from windows, doors, and fresh air intakes. Test for airtightness by running the unit and checking joints with soapy water, looking for bubbles that indicate leaks.
Plan and Run Your PVC Piping

Map Inlet Locations Before Cutting
Before cutting a single pipe, sketch your inlet valve positions on a floor plan. Standard hoses reach 30 feet, so place inlets where one hose can cover most of each room. Avoid positioning inlets behind doors, furniture, or baseboards. For two-story homes, install inlets on every floor using closets or utility chases for vertical pipe runs. Wall inlets typically sit 12 to 18 inches above the floor. Keep bathroom and kitchen inlets away from water sources. Always choose the shortest, straightest pipe routes from the canister to each inlet.
Cut and Glue Pipes for Airtight Seals
Use 2-inch diameter PVC pipe for runs under 30 feet. For longer distances or systems with more than six inlets, upgrade to 2.5-inch pipe. Cut pipes square with a PVC pipe cutter or hacksaw, then deburr the rough edges. Dry-fit all connections before applying any glue. Apply PVC primer to both the pipe end and the fitting socket, then immediately follow with PVC cement. Insert the pipe with a slight twisting motion and hold it steady for 15 to 30 seconds to prevent push-out. Wipe away excess cement and let joints cure for at least 30 minutes before moving. Support horizontal pipes every 4 to 6 feet with plastic hangers.
Minimize Bends to Preserve Suction
Every 90-degree elbow reduces airflow by approximately 5%. Use two 45-degree elbows whenever possible to soften turns. Keep horizontal runs sloping slightly downward at 1/8 inch per foot toward the canister to help debris drain. Never use flexible hose inside walls; rigid PVC ensures consistent suction. In retrofit installations, fish pipes through walls using attic chases or basement ceiling access. For difficult runs, consider surface-mounted track systems if your manufacturer approves them.
Install Inlet Valves the Right Way
Cut Drywall With Precision
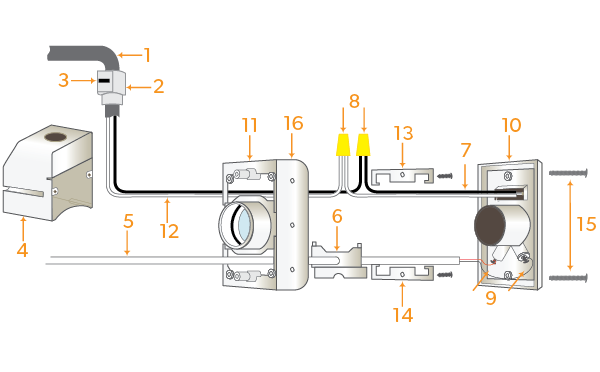
Use the manufacturer’s template to trace a 3.5-inch hole on the wall. Cut carefully with a drywall saw or hole saw, taking care to avoid electrical wires and plumbing behind the surface. Use a stud finder to check both sides of the wall before cutting. Mount the inlet valve box into the wall cavity and secure it to a stud or use drywall anchors. The box must sit flush with the finished wall surface. For tile or hardwood, use a hole saw with water cooling to prevent cracking.
Wire Inlets in a Daisy-Chain Configuration
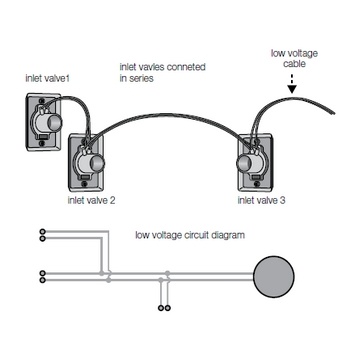
Run 22-2 gauge low-voltage wire from the canister to each inlet. Use a daisy-chain layout: wire runs from the unit to inlet #1, then to inlet #2, and continues onward. Keep the total wire length under 500 feet. Strip ½ inch of insulation from each wire end and connect them to the terminal screws on the inlet valve, noting that polarity does not matter. At the canister, connect the wires to the control board. Some systems require a termination resistor at the final inlet to prevent signal interference. Test continuity with a voltage tester before closing the walls.
Test Activation Before Closing Walls
Insert the vacuum hose into each inlet to confirm the unit turns on automatically. Most systems use a reed switch activated by a magnet in the hose. If an inlet fails to activate, check the wire connections and test for continuity. Make sure the hose is fully inserted, as some models require a twist-lock. For floor inlets, confirm the pedal depresses smoothly and returns without sticking. Fix any problems now, because troubleshooting becomes much harder once the walls are closed.
Connect the Electrical Systems Safely
Use a Dedicated Circuit for the Canister
Plug the canister into a dedicated 15-amp or 20-amp circuit to prevent tripped breakers. Never share the circuit with refrigerators, microwaves, or HVAC systems. Ensure the outlet is grounded and protected by a GFCI if installed in a garage or basement. A surge protector is a smart addition to guard against power spikes. Confirm your circuit can handle the unit’s amperage draw, which typically falls between 8 and 12 amps.
Wire the Control Board Step by Step
Locate the low-voltage terminal strip on the canister. Connect the “in” wire from the first inlet to the common terminal. Connect the “out” wire to the next inlet in the chain. Install a termination resistor at the end of the line if your system requires one. Set the unit to “auto” mode so it activates only when a hose is inserted. Test any manual override switches your model includes. Double-check every connection to prevent arcing or intermittent operation.
Verify Safety Compliance Before Use
Follow NEC (National Electrical Code) standards for all low-voltage wiring. Keep wires at least 1 inch away from high-voltage lines and run them through conduit in exposed areas. Label wires at both ends for future maintenance. If you are unsure about any electrical work, hire a licensed electrician, especially when installing a new circuit. Most manufacturers require professional electrical installation to maintain warranty coverage.
Test System Performance Thoroughly
Check Every Joint for Air Leaks
Turn on the unit and listen for hissing sounds at pipe joints. Hold a smoke pencil or stick of incense near each connection; a steady stream will waver if air is escaping. You can also apply soapy water to joints and watch for bubbles. Mark any problem areas and re-glue those connections. Even small leaks can reduce suction by 10 to 20%. Pay extra attention to inlet valves, elbows, and the canister lid seal.
Measure Suction at the Farthest Inlet
Use an anemometer or airflow meter to test CFM (cubic feet per minute) at both the canister and the farthest inlet. Suction should not drop more than 20% from the unit’s rated output. Typical performance is 100 to 140 CFM at the unit and 90 to 120 CFM at the inlets. If suction is weak, check for clogs, undersized pipe, or too many sharp bends. Run a plumber’s snake or compressed air through suspect lines to clear blockages.
Confirm Reliable Inlet Activation
Test each inlet by inserting the vacuum hose. The unit should start instantly and shut off when the hose is removed. If activation is delayed or inconsistent, check wire continuity and reed switch function. Try a different hose to rule out a weak magnet. For systems with motorized inlets or smart controls, verify that the app or remote operates correctly. Document your results for future reference.
Fix Common Installation Problems
Diagnose Weak Suction Issues
Start by inspecting the filter, since a dirty or clogged filter can reduce suction by up to 30%. Clean or replace it as needed. Check hoses for cracks or hidden blockages. Verify that all pipe joints are sealed and that no pipes are crushed behind walls. Confirm the pipe diameter matches the run length. If multiple inlets show weak suction, the problem is likely near the canister. If only one inlet is weak, focus on that specific inlet’s wiring and piping.
Troubleshoot a Unit That Won’t Start
If the unit fails to start, check the circuit breaker and GFCI outlet first. Test the outlet with another device to confirm it has power. Inspect the low-voltage wires for breaks, since rodents often chew on these. Use a multimeter to test continuity from each inlet to the control board. Replace the control board fuse if it has blown; fuses typically range from 1 to 3 amps. Ensure the termination resistor is installed if your system requires one. If the motor hums but does not start, the capacitor may be faulty and need replacement.
Reduce Noise and Vibration
If the unit vibrates excessively, tighten the mounting bolts and add rubber isolation pads. Make sure the exhaust hose is not touching walls or floors, which can transmit sound. Confirm the unit sits level on its mounting surface. Inspect the impeller for debris that could cause imbalance. For persistent noise, wrap the unit in sound-dampening insulation or build a ventilated enclosure. Never seal the unit in an airtight box, as this will cause the motor to overheat.
Frequently Asked Questions About Vacuum Canister Installation
How long does it take to install a vacuum canister?
Professional installation typically takes 1 to 2 days for an average home. A DIY installation usually requires 2 to 4 days, depending on your experience and the complexity of the pipe routing. Allow extra time for unforeseen obstacles like hidden plumbing or unexpected wall cavities.
Do I need a permit to install a central vacuum system?
Permit requirements vary by location. Most areas require a permit for new electrical circuits but not for the vacuum piping itself. Check with your local building department before starting work. Some manufacturers also require professional installation to keep the warranty valid.
What wire gauge should I use for the inlet valves?
Use 22-2 gauge low-voltage wire for all inlet connections. This gauge is standard across most central vacuum systems. Keep the total wire run under 500 feet to ensure reliable signal transmission. Using a thinner wire can cause activation problems and intermittent operation.
How many inlet valves can I install on one system?
Most canisters support 8 to 12 inlets, though this varies by model and motor power. Check your specific unit’s specifications before planning your layout. Installing more inlets than recommended can reduce suction at each location and strain the motor.
Why is suction weak at only one inlet?
Weak suction at a single inlet usually points to a clog, leak, or crushed pipe in that specific line. Check the pipe connections at the inlet valve and inspect the run for any damage. A soapy water test can reveal air leaks, while a plumber’s snake can clear blockages.
Can I install a central vacuum in a house with existing walls?
Yes, retrofit installations are common, though they require more planning. Use attic chases, basement ceilings, and closet walls to route pipes through existing structures. Surface-mounted pipe tracks are an option for difficult runs. Budget extra time for drywall patching once the installation is complete.
Final Thoughts on Installing a Vacuum Canister
A properly installed vacuum canister system delivers powerful cleaning convenience that lasts 15 to 20 years with minimal maintenance. The three most important factors for success are choosing the right location, planning your pipe routes carefully, and testing every connection before closing up the walls. Take your time during the planning phase to map inlet positions that maximize hose coverage throughout your home.
Your next step is to create a detailed floor plan marking the canister location, every inlet position, and the proposed pipe routes. Use this plan to build a complete materials list, then schedule a weekend to begin the installation. Register your warranty, document the pipe and wire paths for future reference, and set up a filter cleaning schedule to keep your new system running at peak performance.


