
Is your Eureka vacuum leaving dirt behind or making a high-pitched squeal when you run it? A worn or broken belt is usually the culprit. The belt drives the brush roll, which lifts debris from your carpets. When it stretches out or snaps, your vacuum can’t agitate fibers or pick up embedded dirt. The good news is that learning how to change a Eureka vacuum belt is a fast, affordable repair you can do at home in under 15 minutes.
This guide walks you through the exact process for the Whirlwind Eureka Limited Plus Model 4654. You’ll find the right tools, avoid common mistakes, and get your vacuum back to full cleaning power.
Gather Your Tools and Replacement Belt
Before you start, make sure you have everything ready. You’ll need a Phillips head screwdriver and a replacement belt designed for the Model 4654. Eureka part number 4654-1 or a compatible generic belt works well.
Clear a flat workspace, like a kitchen counter or clean floor. Lay down a cloth to avoid scratching the vacuum’s plastic housing.
Pro Tip: Buy replacement belts in packs of two or three. Having spares on hand saves time when the next belt wears out.
Locate the Top Hood Screws
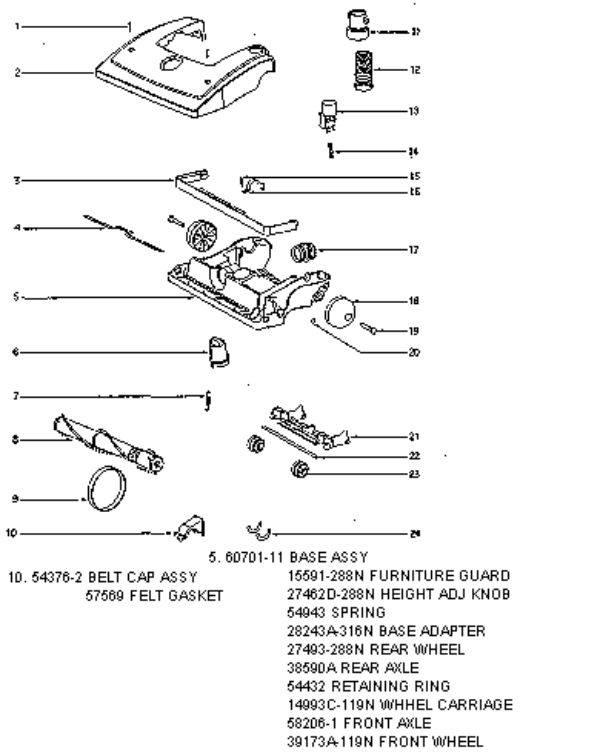
The Whirlwind Eureka Limited Plus Model 4654 has a unique design where the belt is accessed from the top, not the bottom like most vacuums. The first step is finding the two Phillips head screws on the top hood.
These screws are positioned near the front center of the upper housing, just behind the nozzle opening. They are visible on the surface, not hidden under panels or labels. Use a reference image to confirm their location if needed.
Use the Right Screwdriver
Grab a standard manual Phillips head screwdriver. Avoid flathead tools or powered drivers, which can strip the screw heads. Turn counterclockwise to loosen and remove both screws.
Place the screws in a small bowl or on a clean cloth so they don’t roll away. Losing these screws is a common frustration, especially when working over carpet.
Remove the Top Hood
With both screws out, lift the top hood straight up and off the vacuum body. You may need to wiggle it gently if plastic clips are holding it in place. The hood should come off without force.
Set the hood aside in a safe spot. You’ll now see the internal components, including the brush roll, belt path, and motor shaft.
This top-access design is specific to certain Eureka models. Unlike vacuums where you flip the unit over to remove a baseplate, the 4654 requires you to remove the top hood first.
Watch for Hidden Clips
As you lift the hood, check for any plastic clips or wiring connections. The Limited Plus model usually has no wires attached to the hood, but inspect carefully before pulling. If you feel resistance, stop and look for what’s holding it back.
Warning: Forcing the hood can crack plastic clips and cause the casing to sit loosely after reassembly.
Access the Bottom Plate
Now that the top hood is off, the bottom plate is exposed. This plate holds the brush roll and belt assembly in place.
To remove it, press down gently on the release tabs or clips along the edges. Apply even pressure on both sides to pop the plate free. Once detached, set it aside.
You should now have full access to the brush roll and the old belt.
Inspect the Brush Roll
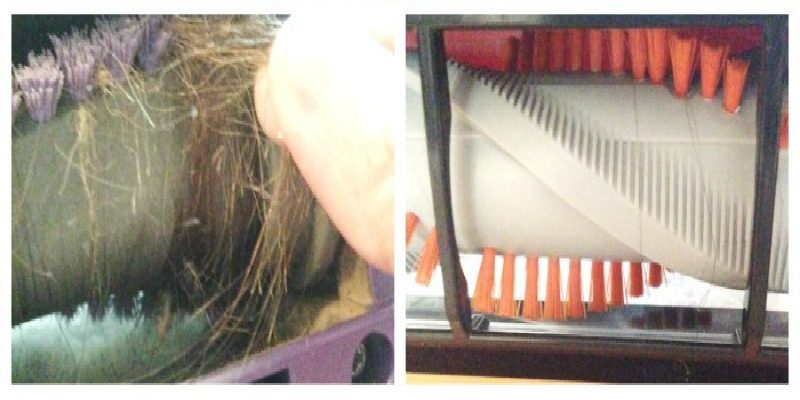
Before installing a new belt, check the brush roll’s condition. Spin it with your fingers to see if it rotates freely. It should turn smoothly without grinding, sticking, or wobbling.
If it’s stiff or hard to spin, clean out any hair, string, or debris wrapped around the ends. Use scissors or a seam ripper to cut away tangled fibers. A seized brush roll can destroy a new belt within minutes.
Also, look for cracks, bent bristles, or worn bearings. If the brush roll is damaged, replace it at the same time as the belt.
Expert Note: A worn brush roll puts extra strain on the motor. Replacing it every one to two belt changes keeps your vacuum running efficiently.
Remove the Old Belt
Slide the old belt off the brush roll and motor shaft. It may be cracked, frayed, or completely broken, all of which are signs of normal wear.
Wipe the motor shaft clean with a dry cloth. Built-up dust or melted rubber can keep the new belt from seating properly and cause it to slip.
Never reuse an old belt, even if it looks intact. Rubber stretches over time, reducing suction and cleaning power.
Clean the Belt Path
Check the motor shaft, brush roll ends, and belt channel for leftover rubber fragments. A broken belt can leave debris behind that interferes with the new belt’s grip.
Use a cotton swab or small brush to remove any residue. A clean path helps the new belt track properly and last longer.
Common Mistake: Skipping this step leads to belt slippage and overheating, which can burn out the new belt quickly.
Install the New Eureka Belt
Loop the new belt around the brush roll first. Then, place the brush roll back into its slots on the bottom plate. With the roll seated, stretch the belt up and onto the motor shaft.
This takes a bit of hand strength. Rotate the brush roll slightly to help the belt climb onto the shaft. Avoid using tools to pull the belt, as pinching it can create weak spots that lead to early failure.
Check Belt Alignment
The belt must sit centered on both the motor shaft and brush roll. If it rides off-center, it will wear unevenly, slip, or snap prematurely.
Make sure the belt isn’t twisted. A twisted belt won’t drive the brush roll and can overheat within seconds. A correctly installed belt forms a straight, flat loop without kinks.
Reassemble the Vacuum
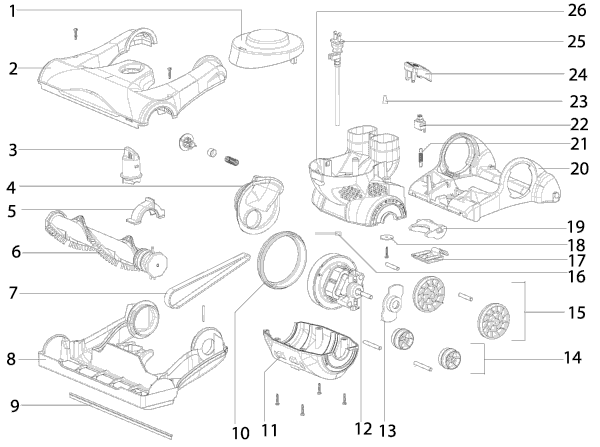
Now work in reverse order. Snap the bottom plate back into place by aligning the tabs and pressing firmly until you hear clicks on both sides.
Next, set the top hood back onto the vacuum body. Align it carefully and press down gently to reengage any internal clips.
Finally, reinsert the two Phillips head screws and tighten them until snug. Don’t over-tighten, as this can strip the plastic housing.
Test Before Full Use
Plug in the vacuum and run it for about 10 seconds. Watch the brush roll opening and listen carefully.
- Does the brush roll spin smoothly?
- Is there any squealing, burning smell, or unusual noise?
If you notice any of these, turn the vacuum off immediately and recheck the belt alignment. If everything sounds quiet and runs smoothly, the replacement was successful.
Safety Check: Test on a hard floor first. Carpets can catch a misaligned brush roll and cause damage.
Choose the Right Replacement Belt
Not every belt fits every Eureka model. For the Model 4654, look for belts specifically labeled for the Whirlwind Eureka Limited Plus. Check your user manual if you’re unsure.
Choose belts made of heat-resistant rubber with reinforced fibers. These materials hold up better under constant friction and heat. Avoid cheap, unbranded belts, which tend to stretch or break within weeks.
OEM vs. Generic Belts
- OEM belts are made by Eureka and offer an exact fit with reliable performance
- Generic belts are more affordable but vary in quality, so verify dimensions before buying
The standard size for this model is roughly 32 inches long and 1/4 inch wide. Measure your old belt if you want to confirm.
Prevent Future Belt Problems
A few simple habits can extend the life of your new belt.
- Clean the brush roll monthly to prevent hair and thread buildup
- Avoid vacuuming large debris like coins, paper clips, or large pieces of paper
- Replace belts every 6 to 8 months with regular use
- Turn off the vacuum before lifting to avoid sudden belt stress
If your vacuum has height adjustment, set it correctly for your floor type. Running the brush too low on thick carpet increases drag and wears out the belt faster.
Warning: A burning smell after replacement means the belt is misaligned or the brush roll is stuck. Stop using the vacuum and inspect immediately.
Troubleshoot Common Issues
Even with careful installation, problems can pop up. Here’s how to address the most frequent ones.
Brush Roll Won’t Spin
- Cause: Belt is off-track, twisted, or broken
- Fix: Open the vacuum and check the belt path. Make sure the belt sits on both the motor shaft and brush roll without twists
Belt Keeps Slipping Off
- Cause: Worn brush roll bearings or incorrect belt size
- Fix: Check the brush roll for wobble and replace it if loose. Confirm the belt dimensions match the original
Burning Smell After Installation
- Cause: Belt rubbing against the housing or residue on the motor shaft
- Fix: Clean the shaft thoroughly and reseat the belt. Make sure no part of the belt touches the plastic casing
Quick Tip: A dry, squeaky belt may benefit from a tiny drop of lubricant on the motor shaft, but only if recommended by Eureka. Most modern belts are designed to run dry.
Frequently Asked Questions About Changing a Eureka Vacuum Belt
How often should I change the belt on my Eureka vacuum?
Replace the belt every 6 to 8 months with regular use. If you vacuum frequently or have pets with heavy shedding, you may need to replace it sooner. Watch for signs like reduced suction, a burning smell, or a brush roll that stops spinning.
Why does my Eureka vacuum brush roll stop spinning?
The most common causes are a broken or stretched belt, tangled hair around the brush roll, or a worn motor. Check the belt first, as it’s the easiest fix. Cleaning debris from the brush roll often solves the issue without needing a new belt.
Can I use a generic belt instead of an OEM Eureka belt?
Yes, generic belts work as long as they match the correct size and type for your model. The Whirlwind Eureka Limited Plus Model 4654 uses a belt roughly 32 inches long and 1/4 inch wide. Quality varies, so choose a reputable brand with heat-resistant rubber.
What tools do I need to change a Eureka vacuum belt?
You only need a Phillips head screwdriver and a compatible replacement belt. No special tools are required. A clean cloth and small brush for cleaning debris are also helpful.
Is it safe to use my Eureka vacuum with a worn belt?
No, running a vacuum with a worn or broken belt can damage the motor and brush roll. A slipping belt generates excess heat, which can melt plastic components or burn out the motor. Replace the belt as soon as you notice performance issues.
How do I know which belt fits my Eureka model?
Check your user manual for the part number, or look at the old belt for a size marking. For the Model 4654, Eureka part number 4654-1 is the correct match. Measure the old belt’s length and width if the markings are unreadable.
Key Takeaways for Changing a Eureka Vacuum Belt
Changing a Eureka vacuum belt is one of the easiest repairs you can do at home. For the Whirlwind Eureka Limited Plus Model 4654, the process starts with removing two screws on the top hood, not flipping the vacuum over. Once you access the brush roll, swapping the belt takes just a few minutes.
Always inspect the brush roll before installing a new belt, and clean the motor shaft to remove old rubber residue. Test the vacuum on a hard floor after reassembly to confirm everything spins smoothly. With the right replacement belt and basic care, your Eureka vacuum will deliver strong suction and reliable cleaning for years.
Ready to get started? Grab a replacement belt, a Phillips screwdriver, and set aside 15 minutes. Your vacuum will run like new before you finish your coffee.


