
A Eufy robot vacuum is one of the smartest investments you can make for a cleaner home, but even the best devices lose their edge when dust, hair, and debris pile up inside. If your unit is leaving trails behind, making louder noises than usual, or struggling to dock, the fix is almost always a thorough cleaning. The good news is that learning how to clean a Eufy vacuum takes less time than you might think, and the payoff in suction power and longevity is huge.
This guide walks you through every component that needs attention, from the dustbin and filter to the brush roll, sensors, and wheels. You’ll also get a realistic maintenance schedule, troubleshooting tips for the most common issues, and advice on which supplies to keep on hand so the job stays quick and easy.
Empty the Dustbin After Every Cleaning Cycle
Remove and Empty the Bin Properly
A full dustbin is the number one cause of weak suction, so make emptying it part of your post-clean routine.
- Power off the robot before opening anything.
- Press the dustbin release button (usually on top of the unit).
- Slide the bin out gently without forcing it.
- Hold it over a trash can and open the bottom flap.
- Tap the side to dislodge stuck debris.
Wipe the interior with a dry cloth or soft brush. Only rinse the dustbin with water if you remove the filter first.
Check the Inlet for Hidden Blockages
Look at the dustbin opening where air enters from the brush housing. Hair, pet food, and paper scraps love to lodge here. A cotton swab or crevice tool clears the path in seconds and restores full airflow.
Clean or Replace the Filter Weekly
Identify Whether Your Filter Is Washable
Eufy vacuums use either washable HEPA filters or non-washable high-performance filters. Washable filters usually look like gray foam layered with pleated paper. Non-washable filters should never touch water, since moisture ruins them instantly.
Clean a Washable Filter the Right Way
- Remove the filter from the dustbin compartment.
- Tap it gently over a trash can to knock loose dust free.
- Rinse under lukewarm water, spraying from the inside out.
- Squeeze lightly without twisting or wringing.
- Air dry for at least 24 hours before reinstalling.
Never speed up drying with a hairdryer or microwave, since trapped moisture damages the motor.
Maintain a Non-Washable Filter
Tap the filter to remove dust, then use a soft brush or handheld vacuum to clean the surface. Replace non-washable filters every 3 to 6 months, and keep a spare on hand so you can rotate while the other dries.
Clear the Main Brush Roll Every Week
Remove the Brush Roll Safely
Hair, thread, and fibers wrap tightly around the brush roll and axle, which strains the motor and ruins cleaning performance.
- Turn the robot upside down on a soft surface.
- Release the brush guard using the side tabs or screws.
- Slide the brush out carefully without bending the bristles.
Check both ends where tangles build up around the bearings.
Cut Away Tangled Debris
Use scissors or a seam ripper to slice through hair wrapped around the axle. Pull debris off in the direction of the bristles to avoid loosening them. Wipe the brush with a damp cloth and clear dirt from the core.
If the bristles are bent, broken, or worn flat, plan on a replacement every 6 to 12 months. Snap the brush back in place and secure the guard before running the vacuum.
Maintain the Side Brushes Monthly

Remove and Clean Each Side Brush
Side brushes sweep debris from edges into the main cleaning path, which means they collect hair quickly and wear out faster than other parts.
- Power off the robot and flip it over.
- Unscrew the side brush (clockwise to loosen on most models).
- Pull it straight off the post.
- Cut away tangled hair with scissors.
- Wipe the bristles with a damp cloth.
Look for cracks or missing bristles. Most side brushes need replacing every 3 to 6 months.
Reinstall the Brush Correctly
Push the brush firmly onto the motor shaft until it clicks. If your model has alignment marks, line them up before tightening the screw. Spin the brush by hand to confirm smooth rotation.
Wipe Down the Sensors Every Two Weeks

Clean Navigation and Safety Sensors
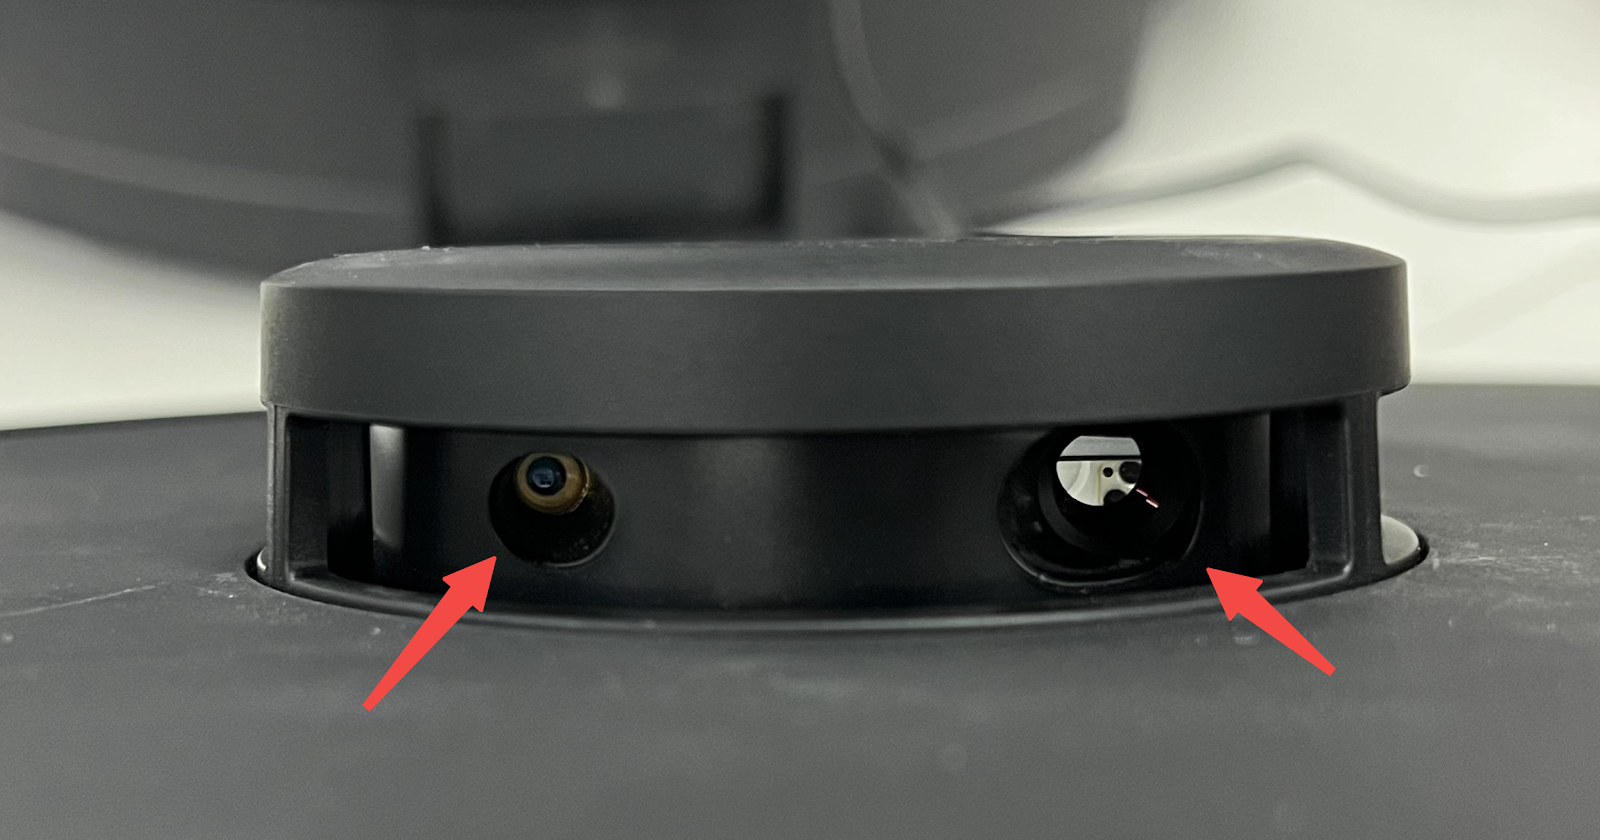
Dust on sensors causes wall-hugging, navigation errors, and falls down stairs. Sensors sit in three main spots:
- On the front bumper for infrared and collision detection
- Around the top lidar or camera lens (on X-series models)
- On the underside for drop and cliff detection
Wipe each lens gently with a dry microfiber cloth. For stubborn grime, slightly dampen the cloth with water, but never spray directly onto the sensors. Skip alcohol, glass cleaner, and solvents, which damage anti-reflective coatings.
Keep the Charging Contacts Clean
Dirty charging contacts stop the robot from powering up properly. Wipe the metal strips on the back of the robot and the dock with a dry cloth. If you spot corrosion, use a water-dampened cloth, then dry everything immediately. Make sure the dock sits on a level surface away from direct sunlight.
Clean the Wheels and Front Caster Monthly

Clear the Drive Wheel Axles
Hair and string wrap around the drive wheel axles and slow the robot down.
- Flip the robot over and spin each wheel by hand.
- Look for tangled debris near the base.
- Cut through strands with scissors.
- Wipe the wheel surface with a damp cloth.
Avoid removing the drive wheels unless absolutely necessary, since they are designed to stay in place.
Remove and Clean the Front Caster
The small front caster helps with steering and tends to collect lint fast.
- Pull the caster straight down from its housing.
- Cut away hair from the stem.
- Rinse under water if the buildup is heavy.
- Dry completely before reinserting.
Press it back in until it clicks, then test the swivel motion to make sure it spins freely.
Inspect the Dustbin Seal for Hidden Air Leaks
A damaged or dirty seal between the dustbin and the robot body lets air escape, which cuts suction even when the bin is empty.
- Remove the dustbin and look at the rubber gasket.
- Check for cracks, deformation, or stuck debris.
- Wipe it with a damp cloth and confirm it sits flush in its groove.
Replace the seal if it looks torn or compressed, since a tight fit is essential for strong performance.
Clean the Charging Dock on a Regular Basis
The dock collects dust that interferes with charging, so a quick wipe-down goes a long way.
- Unplug the power adapter first.
- Wipe the metal contacts with a dry cloth.
- Clean the dock surface with a slightly damp microfiber cloth.
- Remove debris from the robot’s parking zone.
Keep the area around the dock free of furniture and cords so the robot can dock smoothly every time.
Run a Full Deep Clean Once a Month
Follow a Complete Maintenance Checklist
Once a month, give the vacuum the works:
- Empty and rinse the dustbin
- Clean or replace the filter
- Remove and clean the main brush roll
- Inspect and clean the side brushes
- Wipe all sensors
- Clean the charging contacts on robot and dock
- Check the wheels and front caster
- Clean the dock surface
Run a short cleaning cycle afterward to confirm everything works as expected.
Adjust for Seasonal Conditions
- Spring: Replace filters after months of winter dust buildup.
- Fall: Refresh components before heavier indoor use.
- Post-renovation: Clean more often to handle fine dust like drywall or sawdust.
Troubleshoot Common Cleaning Issues
Restore Lost Suction Quickly
If suction drops, work through this short list:
- Empty the dustbin
- Clean the filter and make sure it is fully dry and seated
- Check the suction inlet for clogs
- Confirm the dustbin seal is intact
Around 90% of suction problems come back to a dirty or damp filter.
Fix a Brush Roll That Won’t Spin
Common causes include hair jammed on the axle, a brush that is not seated properly, or a guard that is not clipped in. Remove the brush, clear debris, reinstall it with proper alignment, and confirm the guard clicks into place. If the brush still won’t spin, contact Eufy support.
Solve Docking and Charging Failures
If the robot struggles to dock, clean both the robot and dock contacts, wipe the navigation sensors, and clear any obstructions from the docking path. Place the dock on a level floor and keep it away from reflective surfaces or direct sunlight.
Use the Right Tools and Avoid the Wrong Ones
Recommended Supplies
Keep these nearby for fast cleanups:
- Microfiber cloths (lint-free)
- Soft-bristled brush for filters and crevices
- Scissors or a seam ripper for cutting hair
- Cotton swabs for tight spots
- Lukewarm water for rinsing
- A spare washable filter for rotation
Items to Avoid
Never use these on your Eufy vacuum:
- Hot water, which warps plastic
- Dish soap on filters unless the manual allows it
- Alcohol on sensors
- Abrasive scrubbers
- Compressed air, which pushes debris deeper
- Dishwashers or washing machines
Replace Parts on a Consistent Schedule
Know When to Swap Components
- Filter: Every 3 to 6 months
- Main brush roll: Every 6 to 12 months
- Side brushes: Every 3 to 6 months
- Front caster: As needed if cracked or stiff
Order from the official Eufy website, the Eufy app, or Amazon (sold by Eufy) to make sure you get genuine parts. Third-party parts can cause compatibility issues and may void your warranty.
Stay Safe While Cleaning Your Vacuum
Follow Electrical Safety Basics
- Always power off the robot before disassembly.
- Unplug the charging dock before cleaning it.
- Never immerse any component in water.
- Keep moisture away from ports and vents.
Protect Yourself and the Device
- Use scissors carefully when cutting hair.
- Keep small parts away from children and pets.
- Wear a mask if you have allergies when cleaning filters.
- Never force a part that resists removal.
Routine cleaning does not void the warranty, and Eufy actually requires it to keep coverage valid.
Build Habits That Maximize Lifespan
Set Simple Reminders
A few short habits will keep your vacuum in top shape for years:
- Weekly: Empty the bin, clean the filter, check the brush
- Monthly: Deep clean all components
- Every 6 months: Replace key wear parts
Use the Eufy app to track filter life and receive maintenance alerts.
Optimize How You Use the Vacuum
- Never run on wet floors, since Eufy vacuums are for dry use only.
- Pick up cords, socks, and small objects before starting.
- Store on the dock in a cool, dry place.
- Avoid direct sunlight to prevent plastic degradation.
Frequently Asked Questions About Cleaning a Eufy Vacuum
Can I wash the Eufy vacuum filter with water?
It depends on your model. Washable filters can be rinsed under lukewarm water, but non-washable filters must be replaced. Always air dry washable filters for at least 24 hours before reinstalling.
How often should I replace the Eufy vacuum filter?
Plan on replacing the filter every 3 to 6 months, depending on usage and whether you have pets. The Eufy app can send reminders when it is time.
Why does my Eufy vacuum smell bad?
A musty odor usually means a dirty filter, a full dustbin, or trapped moisture. Empty the bin, clean or replace the filter, and make sure every part is completely dry before reassembly.
Can I use my Eufy vacuum on wet floors?
No. Eufy robot vacuums are designed for dry surfaces only. Using them on wet floors can damage the motor, filter, and electronics.
Does cleaning my Eufy vacuum void the warranty?
No. Routine cleaning is expected and required to keep the warranty valid. The warranty can be affected if you disassemble beyond the manual’s instructions or use non-genuine parts.
What is the best way to remove hair from the brush roll?
Use scissors or a seam ripper to carefully cut along the brush, then pull the hair away in the direction of the bristles. Avoid yanking forcefully, which can damage the brush.
Key Takeaways for Keeping Your Eufy Vacuum in Top Shape
Learning how to clean a Eufy vacuum comes down to three core habits: empty the dustbin daily, clean the filter weekly, and inspect the brush roll every week. Monthly deep cleaning of the sensors, wheels, dock, and seals keeps the whole system running like new.
Set a phone reminder, stock a small cleaning kit with microfiber cloths, scissors, and a soft brush, and the entire routine takes only 10 to 15 minutes a week. Your reward is stronger suction, fewer errors, and a vacuum that lasts for years. Start tonight by emptying the dustbin, tapping out the filter, and clearing any hair from the brush roll.


