
You just unboxed your new Eureka vacuum, but now you’re staring at a tangle of parts and wondering where to start. Whether it’s an upright, canister, or cordless stick model, knowing how to use your Eureka vacuum properly makes all the difference in cleaning performance and longevity. The good news: Eureka designs its vacuums for simplicity and power, but only if you know the right steps to take right out of the box.
Using a Eureka vacuum isn’t just about turning it on and pushing it across the floor. There are key setup steps, attachments to master, and maintenance habits that ensure you get the strongest suction, longest runtime, and deepest clean. From adjusting the height settings for your carpet type to emptying the dust cup without making a mess, every detail counts. This guide walks you through exactly how to use your Eureka vacuum step by step so you can go from confused to confident in under 10 minutes.
Unbox and Identify Your Eureka Vacuum Parts
Before plugging anything in, lay out all components from the box. Most Eureka vacuums come with the main body, hose, wand, floor nozzle, and several cleaning tools.
Check Included Accessories
Common attachments include:
– Dusting brush for blinds, shelves, and furniture
– Crevice tool for tight spaces like corners and between cushions
– Upholstery nozzle for sofas, stairs, and car interiors
– Extension wand that connects hose to nozzle for high-reach cleaning
Ensure all parts are present based on your model’s user manual. Missing pieces? Contact Eureka support with your model number.
Inspect for Shipping Damage
Look for cracks in the hose, misaligned wheels, or loose joints. Test the power cord (if applicable) for fraying. If damage is found, do not operate and return or replace the unit.
Assemble Your Eureka Vacuum in Minutes
Most Eureka models require minimal assembly. Follow these universal steps regardless of vacuum type.
Attach Handle and Wand
For upright and stick models:
1. Slide the handle into the top of the vacuum body until it clicks.
2. For models with a telescoping wand, extend it fully and lock in place.
For canister models:
1. Connect the wand to the hose using a twist-and-lock motion.
2. Attach the other end of the hose to the canister inlet.
Pro tip: Do not force connections. If parts don’t click easily, double-check alignment.
Connect the Cleaning Nozzle
Snap the floor nozzle (also called the power head or brush roll) onto the front of the vacuum body. You should hear a firm click.
On cordless models, ensure the battery is securely locked into place before proceeding.
Power Up: Plug In or Charge Your Eureka
For Corded Models
Plug the vacuum into a working wall outlet. Avoid extension cords, as they can reduce power and overheat.
For Cordless Models
Charge the battery fully before first use. This can take 3 to 5 hours depending on model. Look for these indicator lights:
– Solid red light: Charging
– Solid green or blue light: Fully charged
Warning: Never leave the battery charging overnight or unattended after reaching full charge.
Adjust Settings to Match Your Floor Type
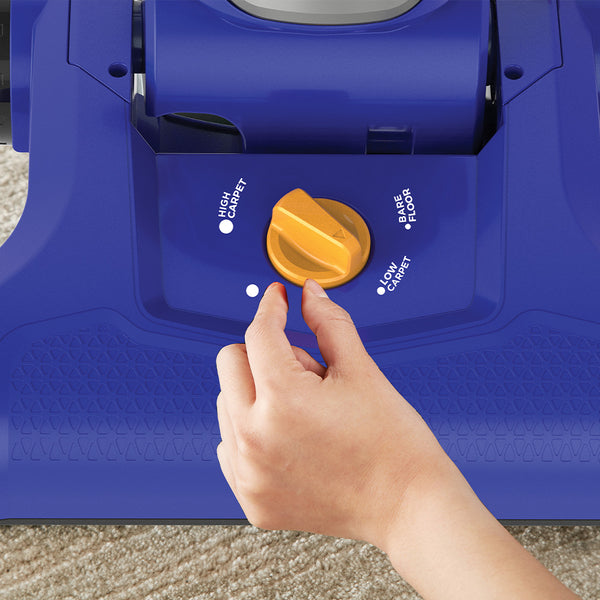
Getting the best clean starts with setting the vacuum to match your flooring.
Set the Height Adjustment Dial
Most Eureka uprights have a dial or lever on the back or side.
- Low pile carpet: Set to medium height
- High pile carpet: Lower the setting (closer to floor)
- Hardwood/tile: Raise to highest setting to disable brush roll or reduce drag
Test on a small area first. If the vacuum struggles or bounces, readjust immediately.
Turn On the Power
Press the power switch, usually located on the handle or body. Some models have variable suction controls. Start low and increase as needed.
For cordless models, press and hold the trigger to run.
Master Every Eureka Vacuum Attachment
Don’t limit your vacuum to floors. Use tools to clean every surface in your home.
Dust Blinds, Shelves, and Ceiling Fans
Attach the dusting brush to the wand or hose. Use slow, overlapping strokes on horizontal surfaces.
Pro tip: Start from the top down to catch falling dust before it resettles.
Clean Tight Corners and Crevices
Use the crevice tool to reach:
– Baseboards
– Window tracks
– Between couch cushions
– Car seats
Insert the tool fully and pull slowly to maximize suction power.
Vacuum Upholstery and Stairs
Switch to the upholstery nozzle. Gently press it into fabric and move in straight lines.
Avoid soaking wet spots, as Eureka vacuums are not steam cleaners.
Empty the Dust Cup or Replace the Bag
A full bin kills suction. Empty after every use or when the bin is two-thirds full.
For Bagless Models
- Turn off and unplug the vacuum.
- Hold over a trash can.
- Press the release button to drop the bottom or remove the bin.
- Tap out debris. Rinse with water if needed and let dry 24 hours before reuse.
- Wipe the bin seal with a dry cloth.
For Bagged Models
- Open the bag compartment.
- Remove the full bag, seal it, and discard.
- Insert a new bag, ensuring it’s seated properly.
- Close the compartment tightly.
Never reuse a bag or run without one, as this can damage the motor.
Maintain Peak Performance With Regular Care

Regular care keeps your Eureka vacuum running like new for years.
Clean the Brush Roll Monthly
Hair and string wrap around the roller. To clean:
1. Turn vacuum upside down.
2. Use scissors or a seam ripper to cut debris free.
3. Pull out tangled fibers.
4. Spin the roller to check for smooth movement.
Do this monthly, or weekly in pet households.
Check and Clean Filters Monthly
Eureka vacuums have one or more filters, including foam, felt, and HEPA types.
To clean:
1. Remove filter from housing.
2. Rinse foam filters under cool water (never hot).
3. Squeeze gently and do not wring.
4. Air dry for 24 hours.
5. Reinstall only when completely dry.
Replace HEPA filters every 6 to 12 months.
Inspect Hose and Wand for Blockages
Blockages reduce suction. To clear:
1. Disconnect hose.
2. Shine a flashlight through both ends.
3. If a clog is visible, use a long, flexible object like a broom handle to push it out.
4. Reconnect and test suction.
Troubleshoot Common Eureka Vacuum Issues
Even well-maintained vacuums have hiccups.
Vacuum Won’t Turn On
Check these potential causes:
– Power outlet: Test with another device
– Cord damage: Look for cuts or kinks
– Reset button: Some models have a thermal reset on the bottom. Press to restore power
For cordless models, ensure the battery is charged and properly seated.
Weak Suction Problems
Common causes include:
– Full dust cup
– Clogged hose or wand
– Dirty or wet filter
– Blocked brush roll
Go through each point above to diagnose the issue.
Brush Roll Not Spinning
- Check for jams: Clear hair or debris
- Belt inspection: If the belt is broken or loose, replace it (see manual for part number)
- Carpet too high: Adjust height setting to a lower position
Maximize Your Eureka Cleaning Efficiency
Use Proper Vacuuming Technique
- Overlap strokes by half the nozzle width
- Move slowly, since rushing reduces pickup
- Make multiple passes on high-traffic areas
Clean in the Right Order
- Dust high surfaces like fans and shelves
- Vacuum upholstery and stairs
- Clean floors from back to front
- Focus on edges and corners last
This prevents kicked-up dust from settling on clean areas.
Store Your Eureka Vacuum Correctly
Improper storage leads to tangles, damage, and mold.
Wind the Cord Safely
Use the cord wrap hooks. Never wrap a hot cord tightly. Let it cool first.
Stand Upright or Hang
Store upright models standing vertically. Canister and stick models can hang on a wall mount or lean in a closet.
Keep attachments clipped to the body or stored together in one spot.
Frequently Asked Questions About Eureka Vacuums
How often should I empty my Eureka vacuum dust cup?
Empty the dust cup after every use or when it reaches two-thirds full. A full bin reduces suction power and can strain the motor over time. For bagged models, replace the bag as soon as it appears full.
Can I use my Eureka vacuum on hardwood floors?
Yes, most Eureka vacuums work on hardwood floors. Set the height adjustment to the highest position to reduce brush roll drag and prevent scratching. Some models allow you to turn off the brush roll entirely for hard surfaces.
How long does a Eureka cordless vacuum battery last?
Battery life varies by model, but most Eureka cordless vacuums run 30 to 45 minutes per charge. First-time charging takes 3 to 5 hours. Replace the battery every 2 to 3 years for optimal performance.
Why is my Eureka vacuum losing suction?
Loss of suction usually stems from a full dust cup, clogged hose, dirty filter, or blocked brush roll. Check each component systematically. Clean or replace filters every 6 to 12 months and clear any visible blockages.
Can I wash my Eureka vacuum filters?
Yes, foam and felt filters can be rinsed under cool water. Never use hot water, as it can damage the filter material. Air dry for 24 hours before reinstalling. HEPA filters typically need replacement rather than washing.
What should I never vacuum with my Eureka?
Avoid vacuuming large debris like glass, wet messes, pet waste, or flammable materials. These can damage the motor, clog the hose, or create safety hazards. Stick to dry household dirt, dust, and small particles.
Key Takeaways for Using Your Eureka Vacuum
Your Eureka vacuum delivers powerful cleaning when you set it up correctly and maintain it on a regular schedule. Start by assembling all parts carefully, adjusting the height for your floor type, and mastering each attachment for different surfaces. Empty the dust cup after every use and clean filters monthly to keep suction strong.
For long-term performance, inspect the hose for clogs, remove hair from the brush roll weekly, and replace filters every 6 to 12 months. Store the vacuum upright with the cord neatly wrapped to prevent damage.
Ready to put your new knowledge to work? Start with a full sweep of one room today. Dust high surfaces first, vacuum upholstery next, then finish with the floors. Your Eureka vacuum is built to last, and now you have everything you need to make the most of every cleaning session.


